How to assemble your own Babington Ball
There are 2 methods to making your Babington ball nozzle. The
first is very simple IF you have the tools. The second is a bit
more complicated, but you don't have to drill the .010 hole.
However it requires metal working tools.
Word of warning for those easily confused by the metric system (or inch
system). My machine tools are all inch measurements. My
mechanical background is working on Japanese motorcycles. All of
my spare nuts and bolts are metric and I use what I have in my shop
when I can. You will find a large quantity of mixing between inch
and metric on this page. When I make something, I frequently have
to use a calculator. When I give a metric tap size or bolt size,
the inch size hole needed IS accurate. 11/64 drill is what you
need for a 5mm x .8 bolt and 13/64 drill is needed for 6mm x 1.0
bolt. If you use inch sized bolts/screws, I have no idea what
drill sizes you'll need...I don't own a set of inch sized taps.
Method #1. Simply take
your dummy doorknob and drill a hole in the front of it with a #87
drill bit. The hole must be at the very tip of the ball.
Then take a male air fitting and weld or epoxy it to the back side of
the doorknob. You'll be done with the nozzle portion.
Method #2. This
method requires machine tools. Almost all of the work will be
done with a lathe. It's possible to do the job with a drill
press, but a lathe makes it easier.
First, a list of parts:
1 Dummy doorknob. Round style obvoiusly.
1 piece of aluminum round stock 1/2 inch in diameter and 1.5 inches
long.
1 piece of hollow steel rod 3/8 inch inner diameter about 6 inches long.
1 piece of 3/4 or 1 inch steel flat stock 4 inches long.
1 piece of 4 inch square 1/8 inch thick aluminum plate.
1 lenght of 10-24 or 10-32 threaded rod and a dozen each of nuts and
washers to fit
1 male air fitting
1 Mikuni N151 motorcycle carburetor jet size #30
1 tube 5 minute epoxy
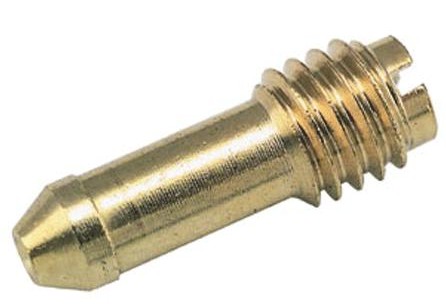
Before I do the step through, a word about the carburetor jet.
This is not something that most people have lying around the house or
have much knowledge about. The Mikuni N151 jet was chosen because
of the
design of the jet. The metering hole is at the very tip and there
are no air bleed holes in it. It is also threaded on the largest
outside diameter of the jet, so it's easy to machine for. You can
get the jet at any motorcycle shop. It should cost about
$2.50. However, if the shop has to order the jet for you, you may
have to buy 4 of them. They come in a 4 pack and some shops will
make you buy the entire pack before they order. The size was
chosen because Mikuni carb jets (in this style of jet) are measured in
millimeters instead of flow rate. The #30 jet has a metering hole
0.30 millimeters in diameter or .0118 inches in diameter. That is
close enough to .010 to get a good flow rate. A #25 jet would be
perfect at .25 mm or .0098 inches, but the #25 jet in the N151 style
has been discontinued. I happened to luck out and find one in the
jet box at the shop I
worked at.
Here is what the N151 jet looks like.
On to the build
Here is a basic line drawing of the ball assembly.
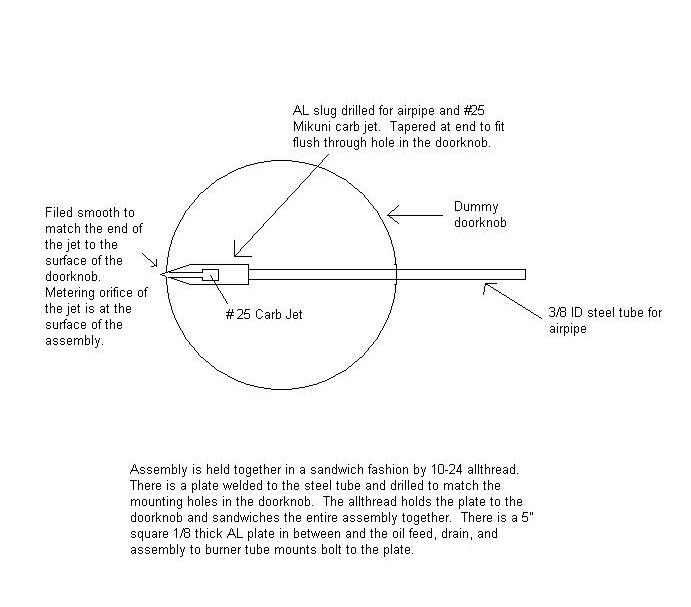
Step 1. Drill the hole in the back of the dummy doorknob enough
to allow the aluminum round stock to slide into the doorknob. You
can use a Dremel to grind the hole bigger if you wish. Do not put
the piece of round stock in the doorknob yet.
Step 2. Chuck the piece of 1/2 aluminum round stock in your lathe
and drill a 11/64 inch hole almost all the way through it. Then
drill a 3/32 hole the rest of the way through it. You need the
hole in the end of the round stock to be smaller than the tip of the
jet. You don't have to be exact with this as you will be
machining down this end of the assembly before you are done.
Step 3. At the other end of the piece of aluminum, drill it out
for the outside diameter of the 3/8 ID steel tube. You may have
to turn down the outside diameter of your steel tube a bit if its
bigger than the aluminum slug.
Step 4. Take a 5mm x .8 tap and thread the inside of the piece of
aluminum stock. Do not let the tap break through the end of the
slug. The jet will thread into the Aluminum slug at this point
and it should bottom out against the end of the aluminum slug.
Step 5. Thread the jet into the slug and put it in your lathe so
that you can machine the end with the tip of the jet. Machine the
end of the slug to a very sharp angle until you see the metering hole
of the jet almost flush with the end of the jet. I used
approximately a 60 degree angle. Then machine it straight back
for about 1/32 of an inch with a diameter of whatever size small drill
bit that you have. These measurements are not super critical, but
you'll see in a minute where I'm going with this.
Step 6. Machine the 3/8 ID steel tube to fit both the aluminum
slug AND the inside of your male air fitting. Do not epoxy the
assembly together yet.
Step 7. Drill a small hole (the size you machined the end of the
slug for) in the very tip of the dummy doorknob. Stick the
aluminum slug on the end of the steel tube, insert it in the doorknob
so that the tip of the jet protrudes through the hole in the
doorknob. If it doesn't fit flush, machine the tip a little
further so that it does. Once the tip of the jet is flush with
the outside of the doorknob, you are ready for the next step.
Step 8. Take the 4 inch piece of flat stock and drill a hole in
the center for the steel tube to fit through. Then drill a hole
at each end for the threaded rod to fit through. These holes
should be drilled on the hole pattern of the dummy doorknob.
Using the flat stock as your template, drill the 5 inch square plate to
match. Then drill the center hole in the flat stock to a bit over
1/2 diameter.
You are now ready to assemble your Babington ball.
Step 9. Slide the steel tube through the center hole of the flat
stock and weld it about 4 inches from where the jet end of the aluminum
slug will be. This flat stock will be the "clamp" that holds the
assembly together.
Step 10. Epoxy the aluminum slug and the air fitting to the steel
tube.
Step 11. Take the threaded rod and cut 2 pieces 6 inchs
long. Bolt the dummy doorknob to the 4 inch square plate using 4
nuts and washers. You should have about 5 inches or more of the
threaded rod sticking out from the 5 inch square plate.
Step 12. Run 2 nuts onto the threaded rod about 3 inches and add
a couple of washers. Slide the steel tube assembly into the
doorknob, jet end first, and make sure that the threaded rod goes
through the holes of the flat stock welded to the steel tube.
Seat the tip of the jet in the hole in the doorknob and run a couple of
washers and nuts up to the flat stock. Snug everything up.
Step 13. Adjusting the nozzle. Using the nuts on the
threaded rod at the welded piece of flat stock, seat the tip of the jet
in the hole in doorknob and tighten everything down until the doorknob
barely bulges. Lock it down at that point.
Step 14. Take a fine file and file the bulge down until the
doorknob is round again.
Your Babington Ball is now complete.
Next you need to construct the actual Babington nozzle assembly around
your Babington ball. Everything attaches to the 4 inch square
aluminum plate with either threaded rod or tapped holes or both.
To construct the rest of the assembly, here is your shopping list.
2 lengths of threaded hollow rod approx 4 inches long (I used the stuff
to make table lamps. I got it at Home Depot)
1 Package of nuts for the hollow threaded rod
1 lamp repair kit (from Home Depot. It contains the angled
bracket you'll need for the feed tube)
1 H1 type rafter tie
1 hunk of 1.5 or 2 inch aluminum round stock an inch or so long (the
funnel)
1 piece of 3/4 inch flat stock, 5 inches long or longer.
1 piece of round metal plate 5.5 inches in diameter
1 length of 1/4 or 5/16 threaded rod
4 nuts and 4 washers to fit the threaded rod
2 pieces of 1/2 inch aluminum round stock
4 bolts 6mm X 20 mm (1/4-20x 3/4 will work just fine)
6 1/4 inch washers (maybe 8 or 10) get a handful
Hollow out the 2 inch slug of aluminum and drill the bottom so you can
thread in the threaded hollow rod. Secure it to the threaded
hollow rod with 2 nuts. This is your drain funnel.
Drill one end of the 3/4 inch flat stock so that you can run the funnel
tube through it. Attach the funnel assembly with 2 more
nuts. Bend the flat stock so that the funnel is centered under
the Babington ball and is relatively close to the aluminum plate.
Drill another hole in the 3/4 inch flat stock, line things up and drill
and tap the mounting hole in the aluminum plate. You may have to
use a few washers as spacers to keep the funnel centered under the
ball. Using the nuts on the threaded hollow rod of the funnel
assembly, adjust the height of the funnel so that it is about 1/4 inch
from the bottom of the ball
Your drain is now done.
Now on to the fuel feed for the Babington ball.
Take the H1 hurricane tie and attach it to the aluminum plate with a
screw and a length of the leftover #10 threaded rod from the ball
assembly project.
Attach the offset bracket from the lamp repair kit to the hurricane tie
directly above the Babington ball.
Thread the other piece of hollow threaded rod into the offset bracket
and lock it down about 1/4 inch from the Babington ball with a nut.
Trim the hurricane tie so that any leftover metal from the flaps is
removed. The mounting flaps of the tie WILL interfere with the
final assembly. When you get it assembled, you will see what I
mean.
Drill a 3/4-7/8 inch hole in the exact center of the 5.5 inch round
plate and using the hole to line things up with the tip of the carb
jet, drill both the aluminum plate and the 5.5 inch round plate for the
1/4 -5/16 inch threaded rod. Use 2 pieces of the rod and the nuts
and washers to attach the 5.5 inch plate to the aluminum plate.
Your Babington nozzle is now almost complete.
Making sure that the assembly is perfectly vertical, drill 2 holes 1/4
inch diameter at the exact vertical poles of the 5.5 inch plate.
These are the points where you will be mounting the Babington nozzle to
your burner tube.
Take the 2 pieces of 1/2 aluminum round stock and drill it on the face
and axis with a 13/64 inch drill. Mill or file a flat spot along
the axis of the 2 pieces of 1/2 inch aluminum. Tap all 4 holes
for a 6mm x 1.0 thread. Bolt the 2 pieces of aluminum to the 5.5
inch round plate using the holes you drilled earlier. These
pieces are what attach the entire Babington nozzle to the burner tube.
The 5.5 inch round plate is what supprts the weight of the entire
Babington assembly AND the air line. Don't use a piece of sheet
metal for your 5.5 inch air restrictor. You probably don't need
to use a 1/8 thick plate to make it, but it's what I had lying around.
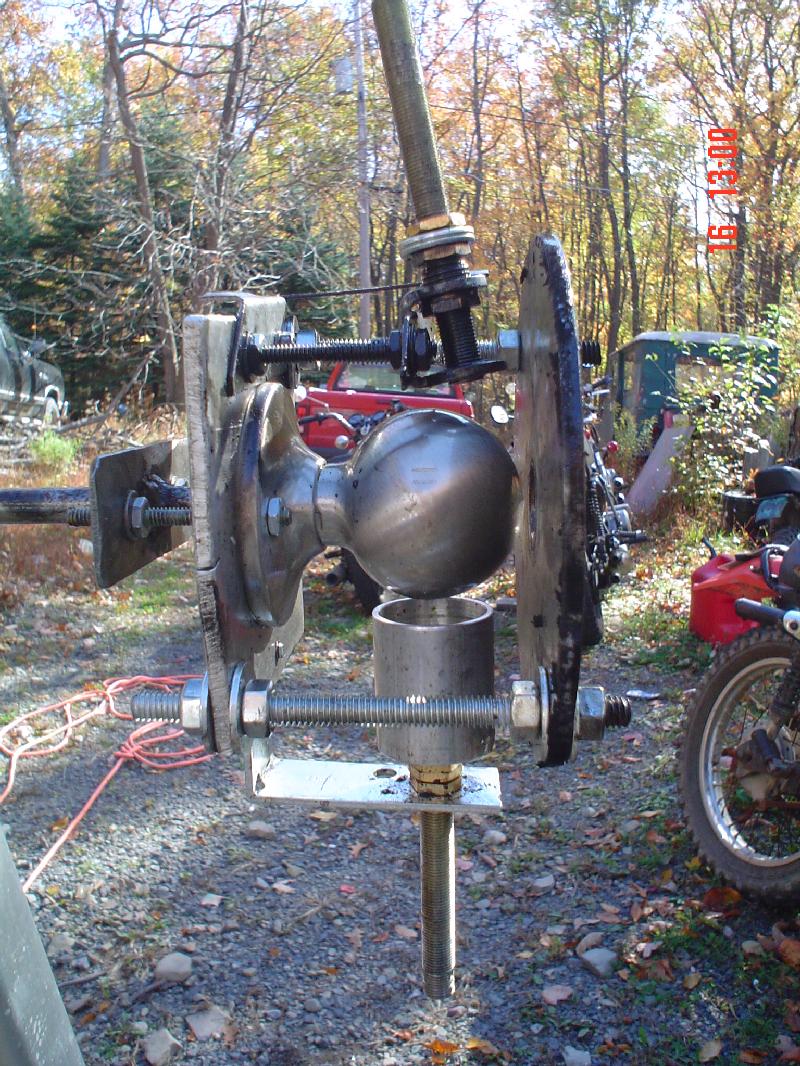
My description of this portion of the assembly is basic. Your
measurements will vary depending on how exact you cut your 4 inch
square plate or if you use what you find in your shop or local
scrapyard. This is one of those things that I would have trouble
describing on a bet. But it's pretty simple when you look at
it. Here is a picture. You see what I mean...easier to show
than describe.
Your Babington nozzle is now complete.
Now to build the actual burner.
Your shopping list.
1 piece of well casing or 6 inch ID thickwall pipe 3.5 foot long.
1 welder (friend or actual machine LOL)
2 pieces of angle iron approx 1 foot in length
1 copper refrigerator icemaker installation kit
1 90 degree compression fitting to fit copper line in icemaker kit.
1 automotive electric fuel pump. Preferably NOT the electronic
type.
1 automotive fuel pressure regulator 1-6 PSI adjustable.
several feet of 1/4 inch fuel line or vinyl tubing
several feet of 3/8 inch fuel line or vinyl tubing
6 worm clamps
1 firebrick 2 inch variety
A fuel tank of some kind (I'm using a 2.5 gallon laundry detergent
bottle)
1 power supply capable of running the fuel pump. I'm using a
motorcycle battery and a 10 amp automatic battery charger.
Take the 3.5 foot long piece of well casing and cut it at a 45 degree
angle. You want the long end of the angle to be at the 3 foot
mark. Plus or minus a couple of inches is fine.
Weld the 2 cut pieces so that you have a tube with a 90 degree angle in
it. The short end of the "90" will be your chimney.
Turn the welded tube chimney side down and weld the 2 pieces of angle
iron to the bottom at a 90 degree orientation to the chimney.
These are the "feet" of the burner. If done correctly, the burner
will now sit on the floor with the chimney perfectly vertical and it
can't roll over on it's side.
Now , orient the tube so that the chimney is vertical and mark the tube
at the exact top and bottom for 2 holes 11/32 or 5/16 inch in diameter
1/4 inch from the end of the long side of the tube. These are the
holes that you will use to bolt the Babington nozzle to the tube
with. The holes are larger than the bolts to allow for alignment.
Attach the burner assembly to the burner tube with the 6mm bolts that
you have left from the previous step. Use washers to center the
burner assembly in the burner tube. You want the 5.5 inch plate
to be completely INSIDE the burner tube. If it is outside the
burner tube, you will have all sorts of turbulence in the fuel stream
and you won't have a stable flame. I did this once and I was able
to actually see the fuel stream rotate like a tornado. Didn't
burn worth a crap.
Drill a hole in the tube on the horizontal axis of the tube 3/8 inch
diameter 1.25 from the end of the long side of the tube. This
hole is where you will light the burner. Exact placement is not
necessary.
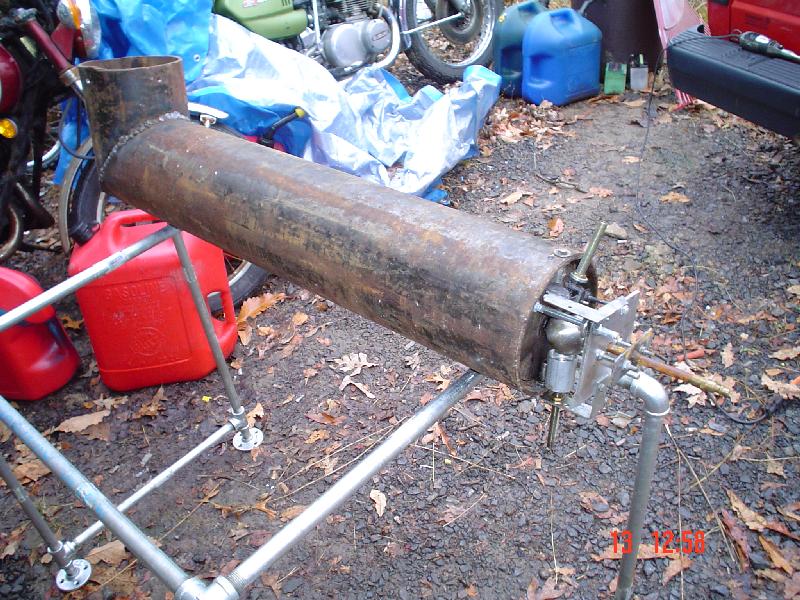
Once everything is bolted together, you should have something that
looks like this (I don't have the feet welded yet):
Now you are ready to plumb the fuel in and fire your burner.
Cut a piece of the copper tube from the icemaker kit 5 inches long and
install 1 end into the 90 degree compression fitting. Do not bend
tis piece of line. It needs to be as straight as possible.
Take another piece of the copper tube about a foot long and install it
in the other side of the compression fitting. This piece can be
bent as it is the intake.
Insert the 5 inch side of the copper assembly into the hollow threaded
rod that is aligned above the Babington ball and either cut it or use
washers to space it up so that the end of the tubing is 1/8-3/16 of an
inch above the ball and just in front of the vertical axis of the ball.
Take a piece of your 1/4 inch fuel line and attach it to the 1 foot
long piece of copper tubing. The other end attaches to your fuel
pump pressure regulator. The fuel pump pressure regulator then
attaches to your fuel pump and the intake of the fuel pump gets a
length of hose that drops into the fuel tank. Clamp all
connections with worm clamps
Take the 3/8 inch fuel line and slide it over the threaded hollow rod
that is at the bottom of your funnel and drop the other end into the
fuel tank. Clamp the connection with a worm clamp.
Insert the firebrick from the chimney end until it is about 1/2 way
into the long end of the burner tube.
Connect the air line.
You are now finished and are ready to fire your Babington burner.
Firing the burner
Starting the Babington burner is relatively simple. Turn on your
fuel pump and wait until the fuel is flowing smoothly over the
ball. Then turn on your air pressure. Starting pressure
depends on the viscosity of the fuel. I've found that when I mix
my oil with Kerosene until it has the viscosity of Diesel fuel, I can
use about 25 PSI of air pressure. Use a propane torch to light
the burner. This is done through the 3/8 inch hole that was
drilled in the side of the burner tube. Hold te flame from the
propane torch in the stream for a few seconds and the flame should then
be self sustaining.
When you fire the burner for the first time, you will have to adjust
alignments. Use the assembly nuts and bolts to align the flame as
close to the center of the burner tube as possible. The firebrick
will prevent alignment in the exact center, so allow for that.
Adjust for the best flame
You can then adjust the flame properties with air pressure for best
results. I've found that with waste motor oil thinned with
kerosene, 25 PSI works perfectly with the chimney that I have in my
garage. Your results will most certainly vary, so you will have
to adjust accordingly.
I hope this helps with your Babington burner.